
Install on Linux
Installation
Installation on Linux is performed with a single command:
bash <(curl -s https://gameap.com/install.sh)
During the installation process, you will be prompted to enter some information.
Host
Specify the domain or IP address at which the panel will be accessible.
In the case of an IP address, it must be an address assigned to the network interface on the VDS. If your network uses NAT, do not specify the external IP, but rather the internal one, and then configure port forwarding.
Any domain can be specified, but do not forget to configure DNS.
Examples of correct values:
- 10.182.104.8
- 10.182.104.8:2080
- example.com
- http://example.com
Database
The database where data will be stored: users, information about servers, etc. You can use PostgreSQL, MySQL and SQLite.
PostgreSQL is recommended in most cases. If the load on your server is expected to be low, and you do not plan to use more than 10 game servers, you can use SQLite.
Some distributions may have MariaDB installed.
Completing the Installation
At the end of the installation, the access details for the panel will be displayed. Do not forget to save this information to access the panel.
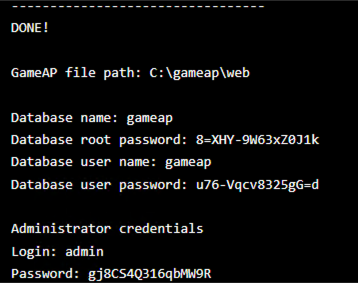
Additional Installation Options
Develop Version
You can install the version currently in development by passing the extra flags
--github --branch=develop to the installer; --develop is a shorthand for --branch=develop
and is used together with --github. The installation takes noticeably longer in this case,
since the panel is built from source.
bash <(curl -s https://gameap.com/install.sh) \
  --github \
  --branch=develop
Building from source needs git, Node.js 24, and Go. GameAP 4.5.0 is built with Go 1.27,
while gameapctl installs Go 1.26.1; the build still succeeds because the Go toolchain downloads
the required version on its own, so besides github.com the machine needs outbound access to
the Go module mirror (proxy.golang.org). On arm64 hosts install Go yourself beforehand:
gameapctl downloads the amd64 Go archive regardless of the architecture.
Such an installation stops being a binary drop-in. gameapctl remembers that the panel was built
from GitHub and from which branch, so every later gameapctl panel upgrade run without flags
rebuilds it from the same branch and needs the same tools. To return to release builds, run
gameapctl panel upgrade --version=<tag>. For production, use the release build.
Non-Interactive Installation
This type of installation lets you install the panel without entering any data during the process. Pass the flags, and the installer will not need any additional input from you.
bash <(curl -s https://gameap.com/install.sh) \
  --non-interactive \
  --host=127.0.0.1 \
  --port=8025 \
  --database=sqlite
Main flags:
| Flag | Purpose |
|---|---|
--non-interactive |
Ask no questions |
--host |
Address at which the panel will be accessible |
--port |
Panel port: 80 by default, 8025 with --scope=user |
--grpc-port |
gRPC port for daemons, 31718 by default |
--database |
sqlite, mysql, or postgres |
--database-host |
Database host |
--database-port |
Database port |
--database-name |
Database name |
--database-username |
Database user |
--database-password |
Database user password |
--with-daemon |
Also install GameAP Daemon |
--version |
Specific panel version, by tag: 4.5.0 |
--scope |
system (default, requires root) or user — see Rootless Installation |
--github |
Build the panel from source instead of installing a release |
--develop |
Shorthand for --branch=develop; combine with --github — see Develop Version |
--branch |
Repository branch for --github. Hidden from --help |
SQLite needs no connection parameters — the database file is created automatically.
If the default port is already taken, the installer takes the first free one of 8025, 8026,
and so on (up to ten are probed) and prints which one it took. A port given explicitly — with
--port or as --host=example.com:8080 — is never replaced: the installer warns, names a free
port to re-run with, and asks whether to continue with the requested one. With
--non-interactive it stops at that warning instead, unless --skip-warnings is given.
--version cannot be combined with --github, --branch, or --develop.
The
--pathand--web-serverflags are leftovers from GameAP 3 and have no effect when installing GameAP 4: the panel is a single executable with a built-in web interface and does not need a separate web server.
Full Installation
To install the GameAP Daemon in addition to the panel itself,
add the --with-daemon flag.
This method is recommended if you plan to host both the panel and game servers on the same VDS.
bash <(curl -s https://gameap.com/install.sh) --with-daemon
Rootless Installation
With --scope=user, the panel — and, with --with-daemon, the daemon — is installed without
root into the current user’s home directory and runs as a systemd user unit. Linux only.
gameapctl panel install --scope=user --host=example.com --database=sqlite
The scope is recorded at install time, so the other commands — start, stop, restart,
status, upgrade, uninstall, change-password, https — pick it up on their own. Pass
--scope=user explicitly if the state file in ~/.gameapctl was lost.
| What | System scope | User scope |
|---|---|---|
config.env |
/etc/gameap/config.env |
~/.config/gameap/config.env |
| Data | /var/lib/gameap |
~/.local/share/gameap |
| Binary | /usr/bin/gameap |
~/.local/bin/gameap |
| systemd unit | /etc/systemd/system/gameap.service |
~/.config/systemd/user/gameap.service |
~/.local/bin is often missing from PATH in non-login shells. The service is unaffected — the
unit uses absolute paths — but to run gameap by name add it: export PATH="$HOME/.local/bin:$PATH".
What is required:
- Linux with systemd.
- A real login session, so that
systemctl --usercan reach the user bus: connect withssh user@hostormachinectl shell user@, not withsuorsudo -u. - Lingering, so that the services survive logout and start at boot. The installer tries to enable
it and warns when that is denied. Check with
loginctl show-user $USER --property=Linger; if it printsLinger=no, runsudo loginctl enable-linger $USER.
Limitations:
- Ports below 1024 are normally unavailable to an unprivileged process, so the panel defaults to
8025and HTTPS to8443. The installer probes the port rather than rejecting anything below 1024, so low ports still work where the administrator lowerednet.ipv4.ip_unprivileged_port_start. - No database server is installed — SQLite is the default.
--database=mysqlor--database=postgresis accepted only for an existing server, described with--database-host,--database-name,--database-username, and--database-password(plus--database-portfor a non-default port). - Build tools are not installed.
--githubneedsgit,go, andnpmto be present already. - Let’s Encrypt
http-01is unavailable — the challenge requires port 80. Usedns-01; see HTTPS and Certificates. - The
gameapsystem user and group are not created: everything runs as the current user.