
Games
Adding new games
The control panel supports the launch and basic control of any game servers and applications. If the panel does not contain a game you need, you can add it.
To add a new game, go to “Administration” → “Games”, then select “Add Game”.
After adding the game, add the first mod of this game and specify the the game server start parameters.
Fields
Code
Game code is a unique value. Usually, this is a game name abbreviation, for example for
“7 Day To Die”, the code is 7d2d. The code must be unique. You can enter any, but it must be unique.
Start code
Start code is usually specified in the start parameters. This value can be anything, but more often it matches the game code. It may match with other games.
Game name
Just enter the full game name.
Game engine
Game engine is the system where the game is written. Half-Life, Counter-Strike are written in the GoldSource engine.
Half-Life 2, Counter-Strike Source are written in Source. Sometimes you do not know the game engine, in this case, you can enter the game code or some game abbreviation.
For games written in GoldSource and Source, enter the exact engine name. For games written in Unity, it’s better to enter
some game abbreviation, for example Rust is written in Unity, but the engine name is rust.
Minecraft is written without using any engine, so the engine name is also “Minecraft”.
Engine version
Numeric or string value of the engine version. You can specify any semantic value, for example, “legacy”, “beta”, and so on.
Steam App ID
Game server ID on Steam. Used to install the server through SteamCMD. You can find SteamID on Steam official wiki, or in the SteamDB.
Steam App Set Config
Additional options for installing the server through SteamCMD. You can find some values on Steam official wiki
Local repository
Path on the dedicated server to the archive or to the directory with the game build used as a template. This path must exist on the dedicated server where a new game server is installed. When adding a new game server, the archive will be unpacked into the game server working directory.
The following archives are supported: Zip, 7z, Tar, XZ, Bzip, GZip.
RAR archives are not supported.
Examples
Example game server working directory /srv/gameap/servers/example-server
| Local Repository field value | Value validity | Installation result |
|---|---|---|
/srv/gameap/repo/cs16_gungame.zip |
Valid, if the archive exists on the dedicated server | The cs16_gungame.zip archive contents will be unzipped into /srv/gameap/servers/example-server |
/srv/gameap/repo/cs16_public |
Valid, if the directory exists on the dedicated server | The directory contents will be copied to /srv/gameap/servers/example-server |
/srv/gameap/repo/cs16_gungame.rar |
Invalid. RAR archives not supported | Installation method from the local repository will be skipped or the server will not be installed |
https://cdn.gameap.com/cstrike-1.6/rehlds-amxx-reunion.tar.xz |
Invalid. Value for remote repository is specified | Installation method from the local repository will be skipped or the server will not be installed |
Remote repository
Link to a remote source. This must be a URL to an HTTP or FTP resource. Archive must be accessible via direct link without any intermediate pages that require waiting or additional action. Links to Yandex Disk, Google Drive, etc. are not supported.
Ready-made builds live in the GameAP repository — cdn.gameap.com worldwide and cdn.gameap.ru
for Russia. The file list cannot be browsed: directory listing is disabled and only direct links
work. Rather than looking for them by hand, use the Upgrade games button — the bundled game
configurations already contain the right URLs, see
Games Import.
Examples
Example game server working directory /srv/gameap/servers/example-server
| Remote Repository field value | Value validity | Installation result |
|---|---|---|
https://cdn.gameap.com/cstrike-1.6/rehlds-amxx-reunion.tar.xz |
Valid | The rehlds-amxx-reunion.tar.xz will be loaded and unzipped to /srv/gameap/servers/example-server |
/srv/gameap/repo/cs16_gungame.zip |
Invalid. The http or ftp resource must be specified | Installation method will be skipped or the game server will not be installed. |
Adding new mods
Each game can have many mods, each has its own features, settings, startup parameters, configuration files, etc.
To add a new game, go to “Administration” → “Games”, then select “Add Mod”
Fields
Game
The game which the mod belongs to.
Name
Mod name. This may be the name of the addon, build, kernel, any feature, etc. Enter the full name at your discretion.
Repositories
The mod may have its own set of files and settings written over the files of the main build. You can include any additional plugins, additional content, sounds, music, etc., in the file archive. Local repository fields are optional.
The following archives are supported: Zip, 7z, Tar, XZ, Bzip, GZip.
RAR archives are not supported.
Local repository
Path on the dedicated server to the archive or to the directory with the game mod files used as a template. This path must exist on the dedicated server where a new game server is installed. When installing the game server, the archive will be unzipped over the main build into the game server working directory.
The following archives are supported: Zip, 7z, Tar, XZ, Bzip, GZip.
RAR archives are not supported.
Examples
Example game server working directory /srv/gameap/servers/example-server
| Local Repository field value | Correctness of value | Installation result |
|---|---|---|
/srv/gameap/repo/cs16_gungame.zip |
Valid, if the archive exists on the dedicated server | The cs16_gungame.zip archive contents will be unzipped into /srv/gameap/servers/example-server |
/srv/gameap/repo/cs16_gungame |
Valid, if the directory exists on the dedicated server | The directory contents will be copied to /srv/gameap/servers/example-server |
/srv/gameap/repo/cs16_gungame.rar |
Invalid. RAR archives not supported | Archive unzipping will be skipped |
https://cdn.gameap.com/cstrike-1.6/rehlds-amxx-reunion.tar.xz |
Invalid. Remote repository value is specified | Mod installation will be skipped |
Remote repository
Link to a remote source. This must be a URL to an HTTP or FTP resource. Archive must be accessible via direct link without any intermediate pages that require waiting or additional action. Links to Yandex Disk, Google Drive, etc. are not supported.
Ready-made builds live in the GameAP repository — cdn.gameap.com worldwide and cdn.gameap.ru
for Russia. The file list cannot be browsed: directory listing is disabled and only direct links
work. Rather than looking for them by hand, use the Upgrade games button — the bundled game
configurations already contain the right URLs, see
Games Import.
Examples
Example game server working directory /srv/gameap/servers/example-server
| Remote Repository field value | Value validity | Installation result |
|---|---|---|
https://cdn.gameap.com/cstrike-1.6/rehlds-amxx-reunion.tar.xz |
Valid | The rehlds-amxx-reunion.tar.xz will be loaded and unzipped to /srv/gameap/servers/example-server |
/srv/gameap/repo/cs16_gungame.zip |
Invalid. Http or ftp resource must be specified | Mod installation will be skipped |
Editing mods
After the mod is created, open it for editing: “Administration” → “Games”, then pick the mod in the game’s mod list. The editor is split into tabs:
| Tab | What is on it |
|---|---|
| Main | Mod name, local and remote repositories, default start commands |
| Game Servers Commands | RCON commands: kick, ban, rename, restart, map change, message, password |
| Metadata | Key–value pairs read by the daemon, for example container settings |
| Vars | Variables that become per-server settings and {shortcodes} |
| Fast RCON commands | Custom RCON commands shown as buttons in the server’s RCON console |
Main settings
Mod name
Repositories
Repositories are set separately for Linux and Windows nodes: Local Repository (Linux), Local Repository (Windows), Remote Repository (Linux), Remote Repository (Windows). Read more in Adding new mods, repositories.
Default start commands
There are two fields: Start Command (Linux) and Start Command (Windows). When a game server is created for this mod with an empty start command, the field matching the node’s operating system is copied into it. If that field is empty too, the start command has to be entered for every game server by hand — a game server cannot be started without one.
You can use shortcodes in start commands; they are replaced with the values of server variables.
A shortcode is a word without spaces in braces {, }, for example {ip}, {port}, {maxplayers}.
Basis shortcodes
These shortcodes are always available; they do not require adding variables to the mod.
| Shortcode | Description |
|---|---|
{ip}, {host} |
Game server IP |
{port}, {SERVER_PORT}, {PORT} |
Game server main port. Sometimes called a connect port |
{query_port} |
Query port |
{rcon_port} |
Server communication port (RCON port) |
{rcon_password} |
RCON password |
{id} |
Server ID in the panel |
{uuid} |
Server UUID |
{uuid_short} |
Short server UUID |
{dir} |
Absolute path to the server working directory |
{game} |
Start code of the game |
{user} |
System user the server runs as |
{node_work_path} |
Daemon working directory on the node, for example /srv/gameap |
{node_tools_path} |
tools directory inside the daemon working directory |
User-defined shortcodes
You define these shortcodes yourself for each mod in the Vars tab; they are replaced with the values of the game server’s settings. Read more in Variables.
Two rules apply when a command is rendered:
- Built-in shortcodes win: a variable named
portordirdoes not change the built-in value. - Every variable is substituted in three spellings — exactly as named, all lowercase and all
UPPERCASE. A variable
maxplayersalso replaces{MAXPLAYERS}, and a variable imported from a Pelican egg asSERVER_NAMEalso replaces{server_name}. Other mixed-case spellings are left as is.
Variables
Variables are declared in the Vars tab. Each variable becomes a setting of every game server of
this mod and a shortcode {variable} for the start command. Users edit the values on the server
page, in the Settings tab — see Game servers.
| Field | Description |
|---|---|
| Var | Variable name, without braces: letters, digits and underscores, not starting with a digit, up to 32 characters. The games catalog accepts only lowercase names and the editor warns about any other; the panel itself also accepts uppercase, so variables imported from Pelican eggs keep their names |
| Info | Short label shown next to the setting, up to 128 characters. Required |
| Type | Kind of value and the widget the user sees, see Types. String by default |
| Default | Value used while the server has no value of its own, up to 64 characters. For a Switch it must equal one of the two switch values |
| Description | Long help text shown as a hint under the field, up to 1000 characters |
| Admin Var | The variable is shown only to administrators (users with the admin roles & permissions permission). Other users do not see it in the Settings tab at all, and a value they send for it is ignored; administrators see it with an Admin only badge |
Types
| Type | Value of type |
Widget and value |
|---|---|---|
| String | string |
Single-line text field. Used when no type is set |
| Text | text |
Multi-line text field |
| Integer | int |
Number field for whole numbers |
| Decimal number | float |
Number field, fractional part allowed |
| Switch | bool |
On/off switch; stores Value when enabled or Value when disabled |
| Select | select |
Drop-down list of predefined Options |
| Password | password |
Text field with hidden input |
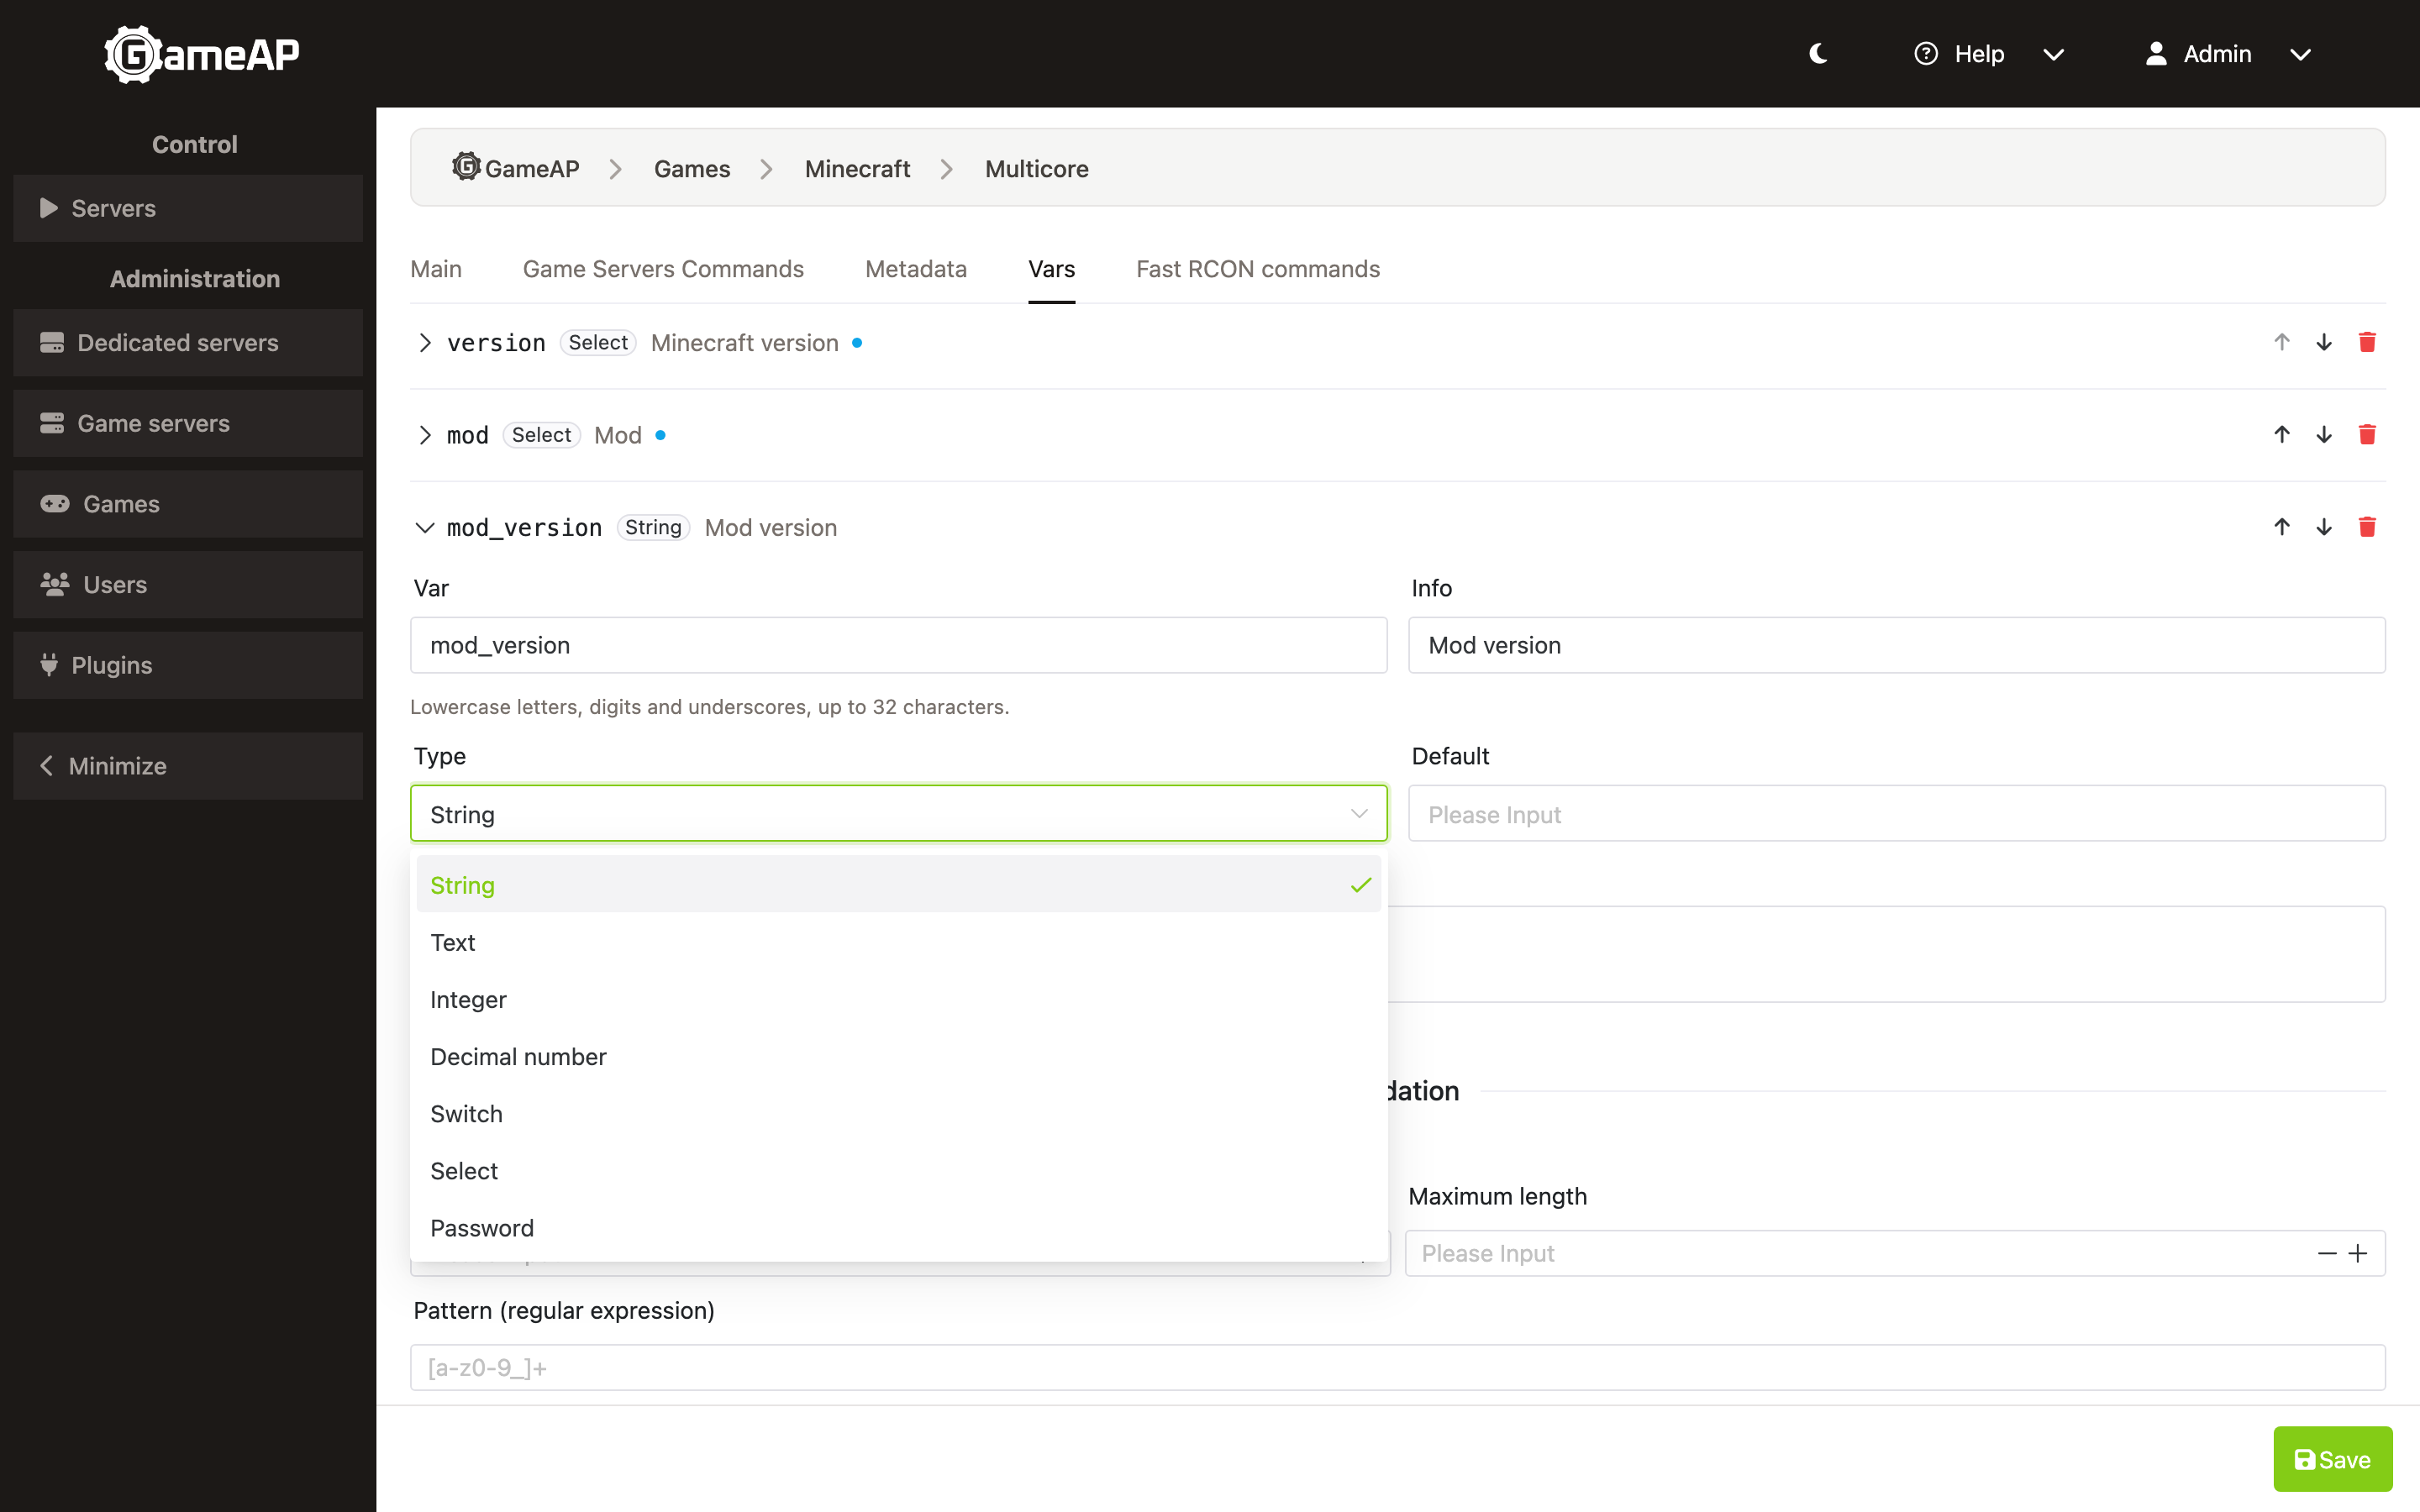
Whatever the type, the value is stored and substituted into commands as a string.
Switch. The two values are 1 and 0 by default and can be changed (up to 64 characters each,
they must differ). Value when disabled may be empty — handy for flags that are either present in
the command or not. The default value must equal one of the two.
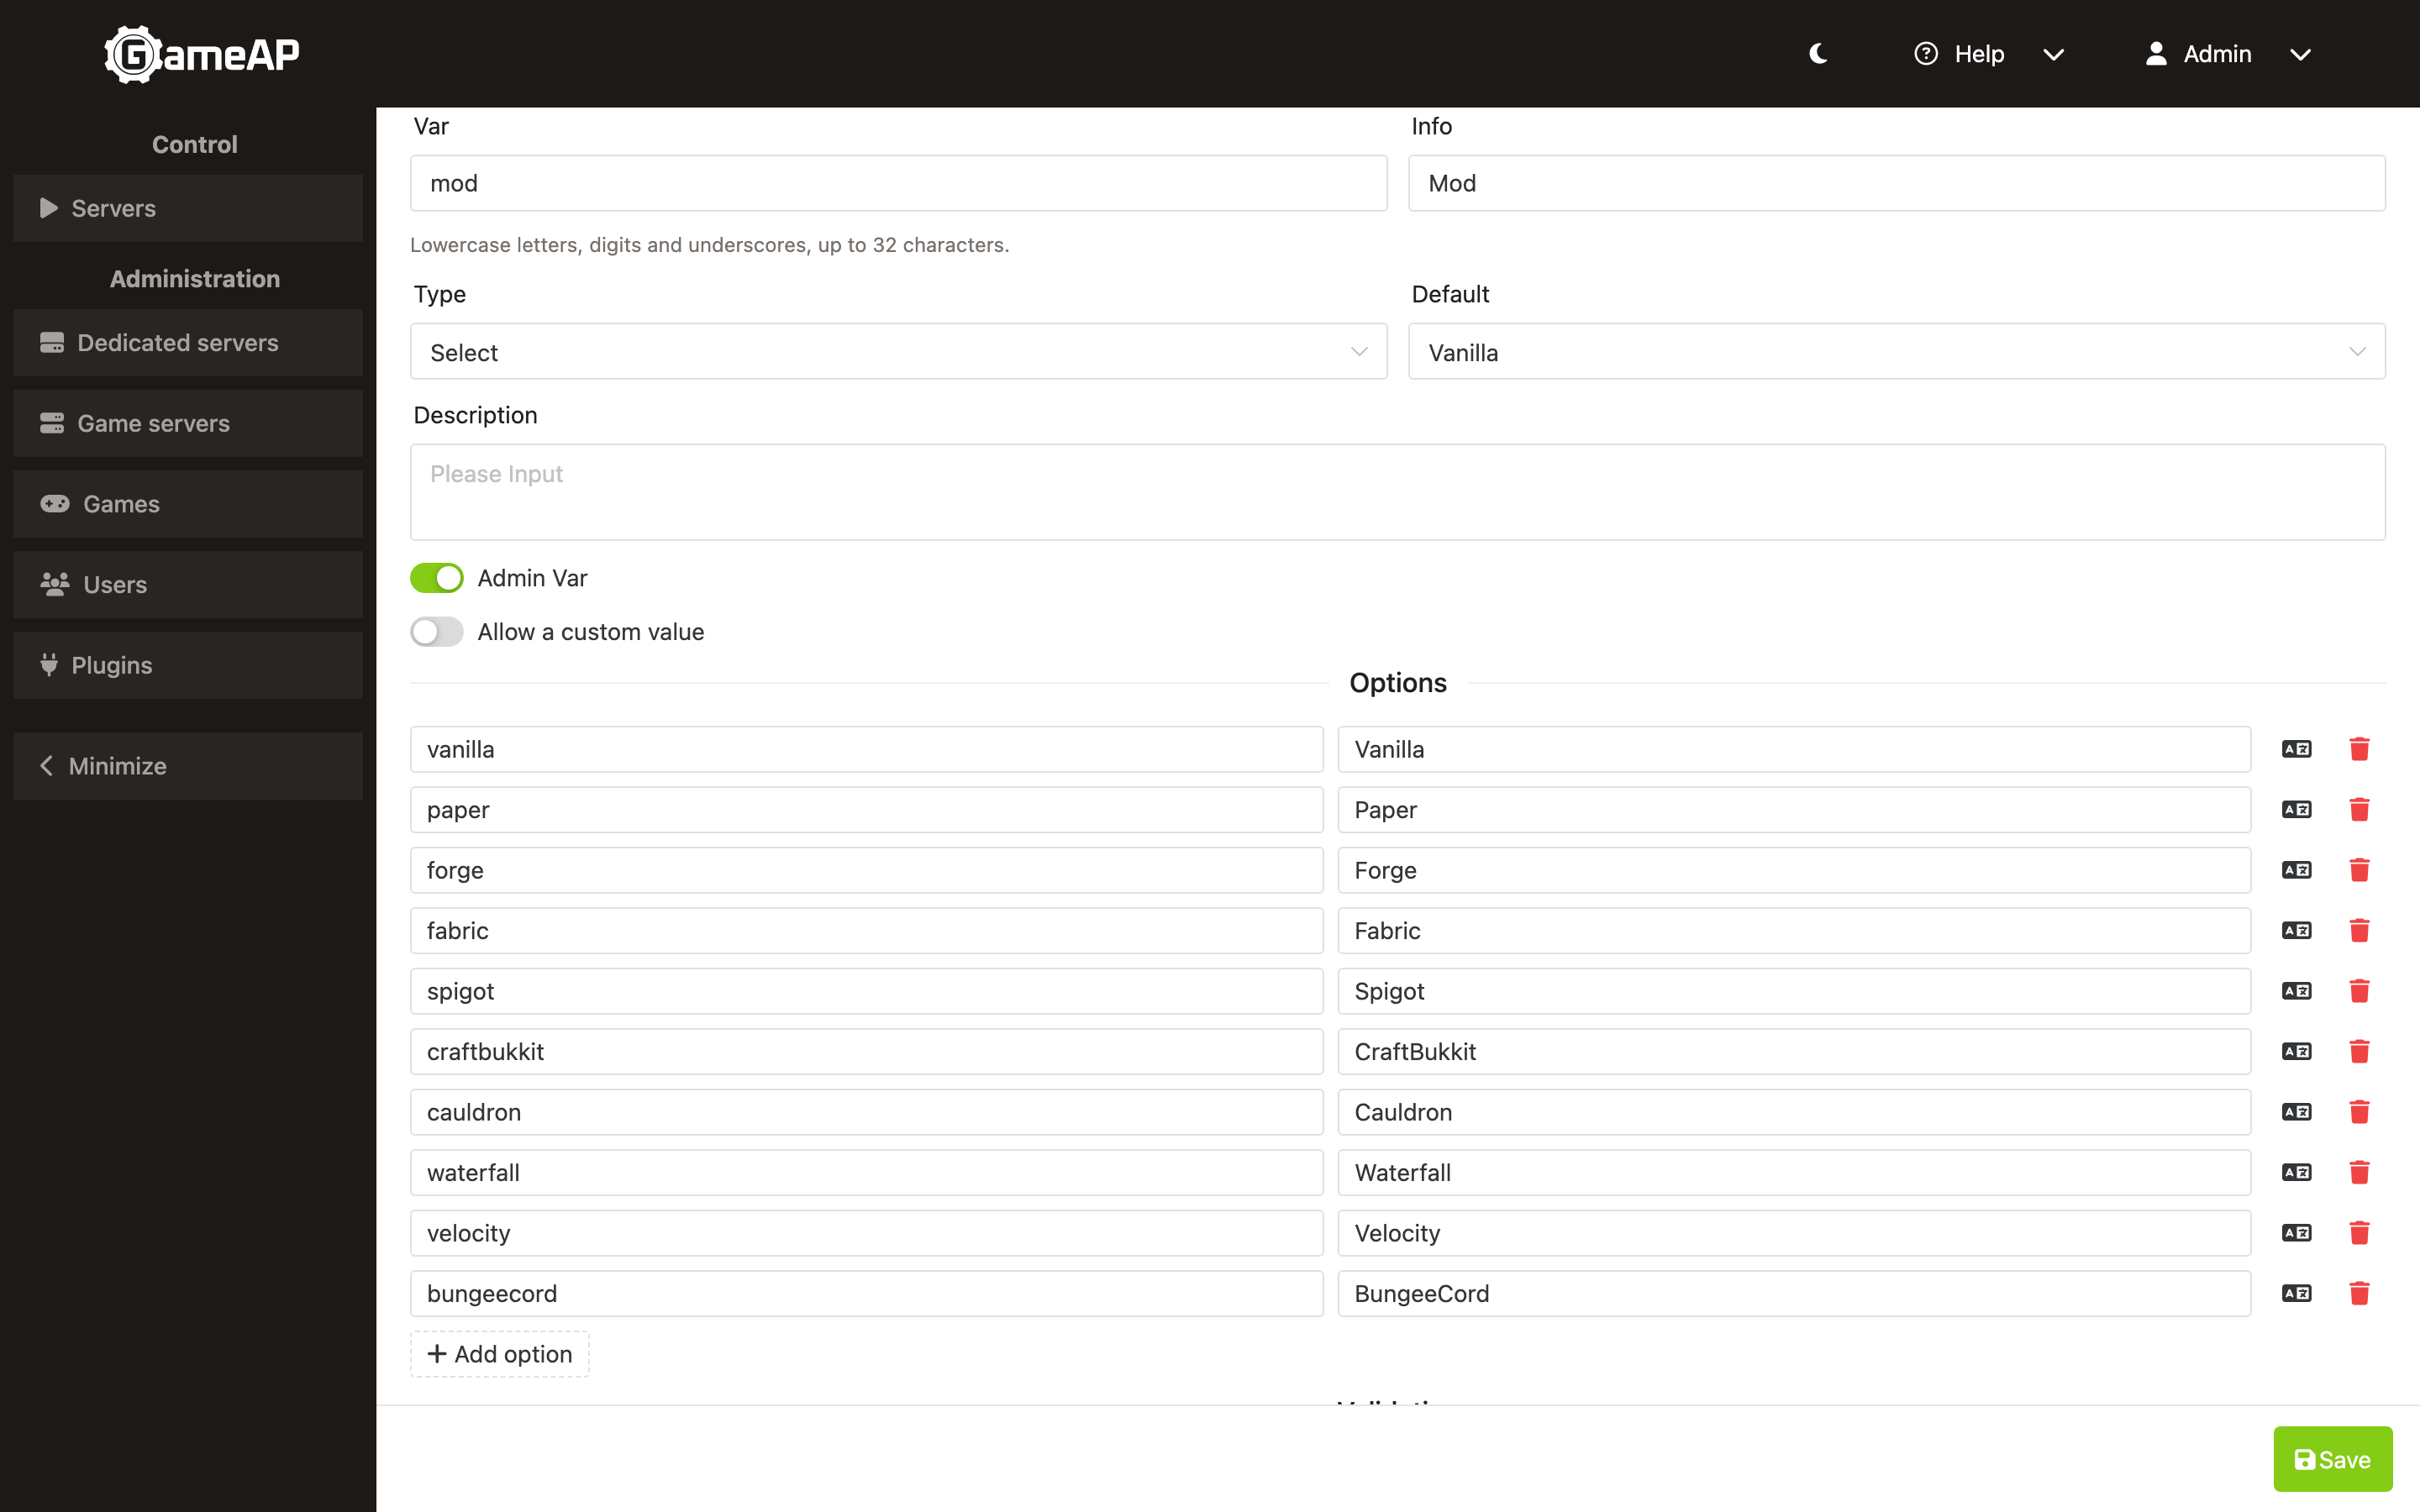
Select. Every option has a Value — the string that is stored and substituted, up to 64 characters, unique within the list — and an optional Label shown to the user (up to 128 characters; equals the value when empty). At least one option is required. With Allow a custom value enabled the user may type a value that is not in the list; such a value is checked against the length and pattern rules below.
Validation
Rules from the Validation block are checked when a server setting is saved; a value that breaks them is rejected. Rules apply to non-empty values only — an empty value is rejected by Required and nothing else.
| Rule | Types | Meaning |
|---|---|---|
| Required | all | An empty value is not accepted |
| Minimum, Maximum | Integer, Decimal number | Bounds of the value; the number field is limited to them |
| Minimum length, Maximum length | String, Text, Password, Select with custom values | Length of the value in characters |
| Pattern (regular expression) | String, Text, Password, Select with custom values | The whole value must match the expression. RE2 syntax — no lookarounds or backreferences — up to 512 characters. The Test value field under the pattern checks a sample right in the editor |
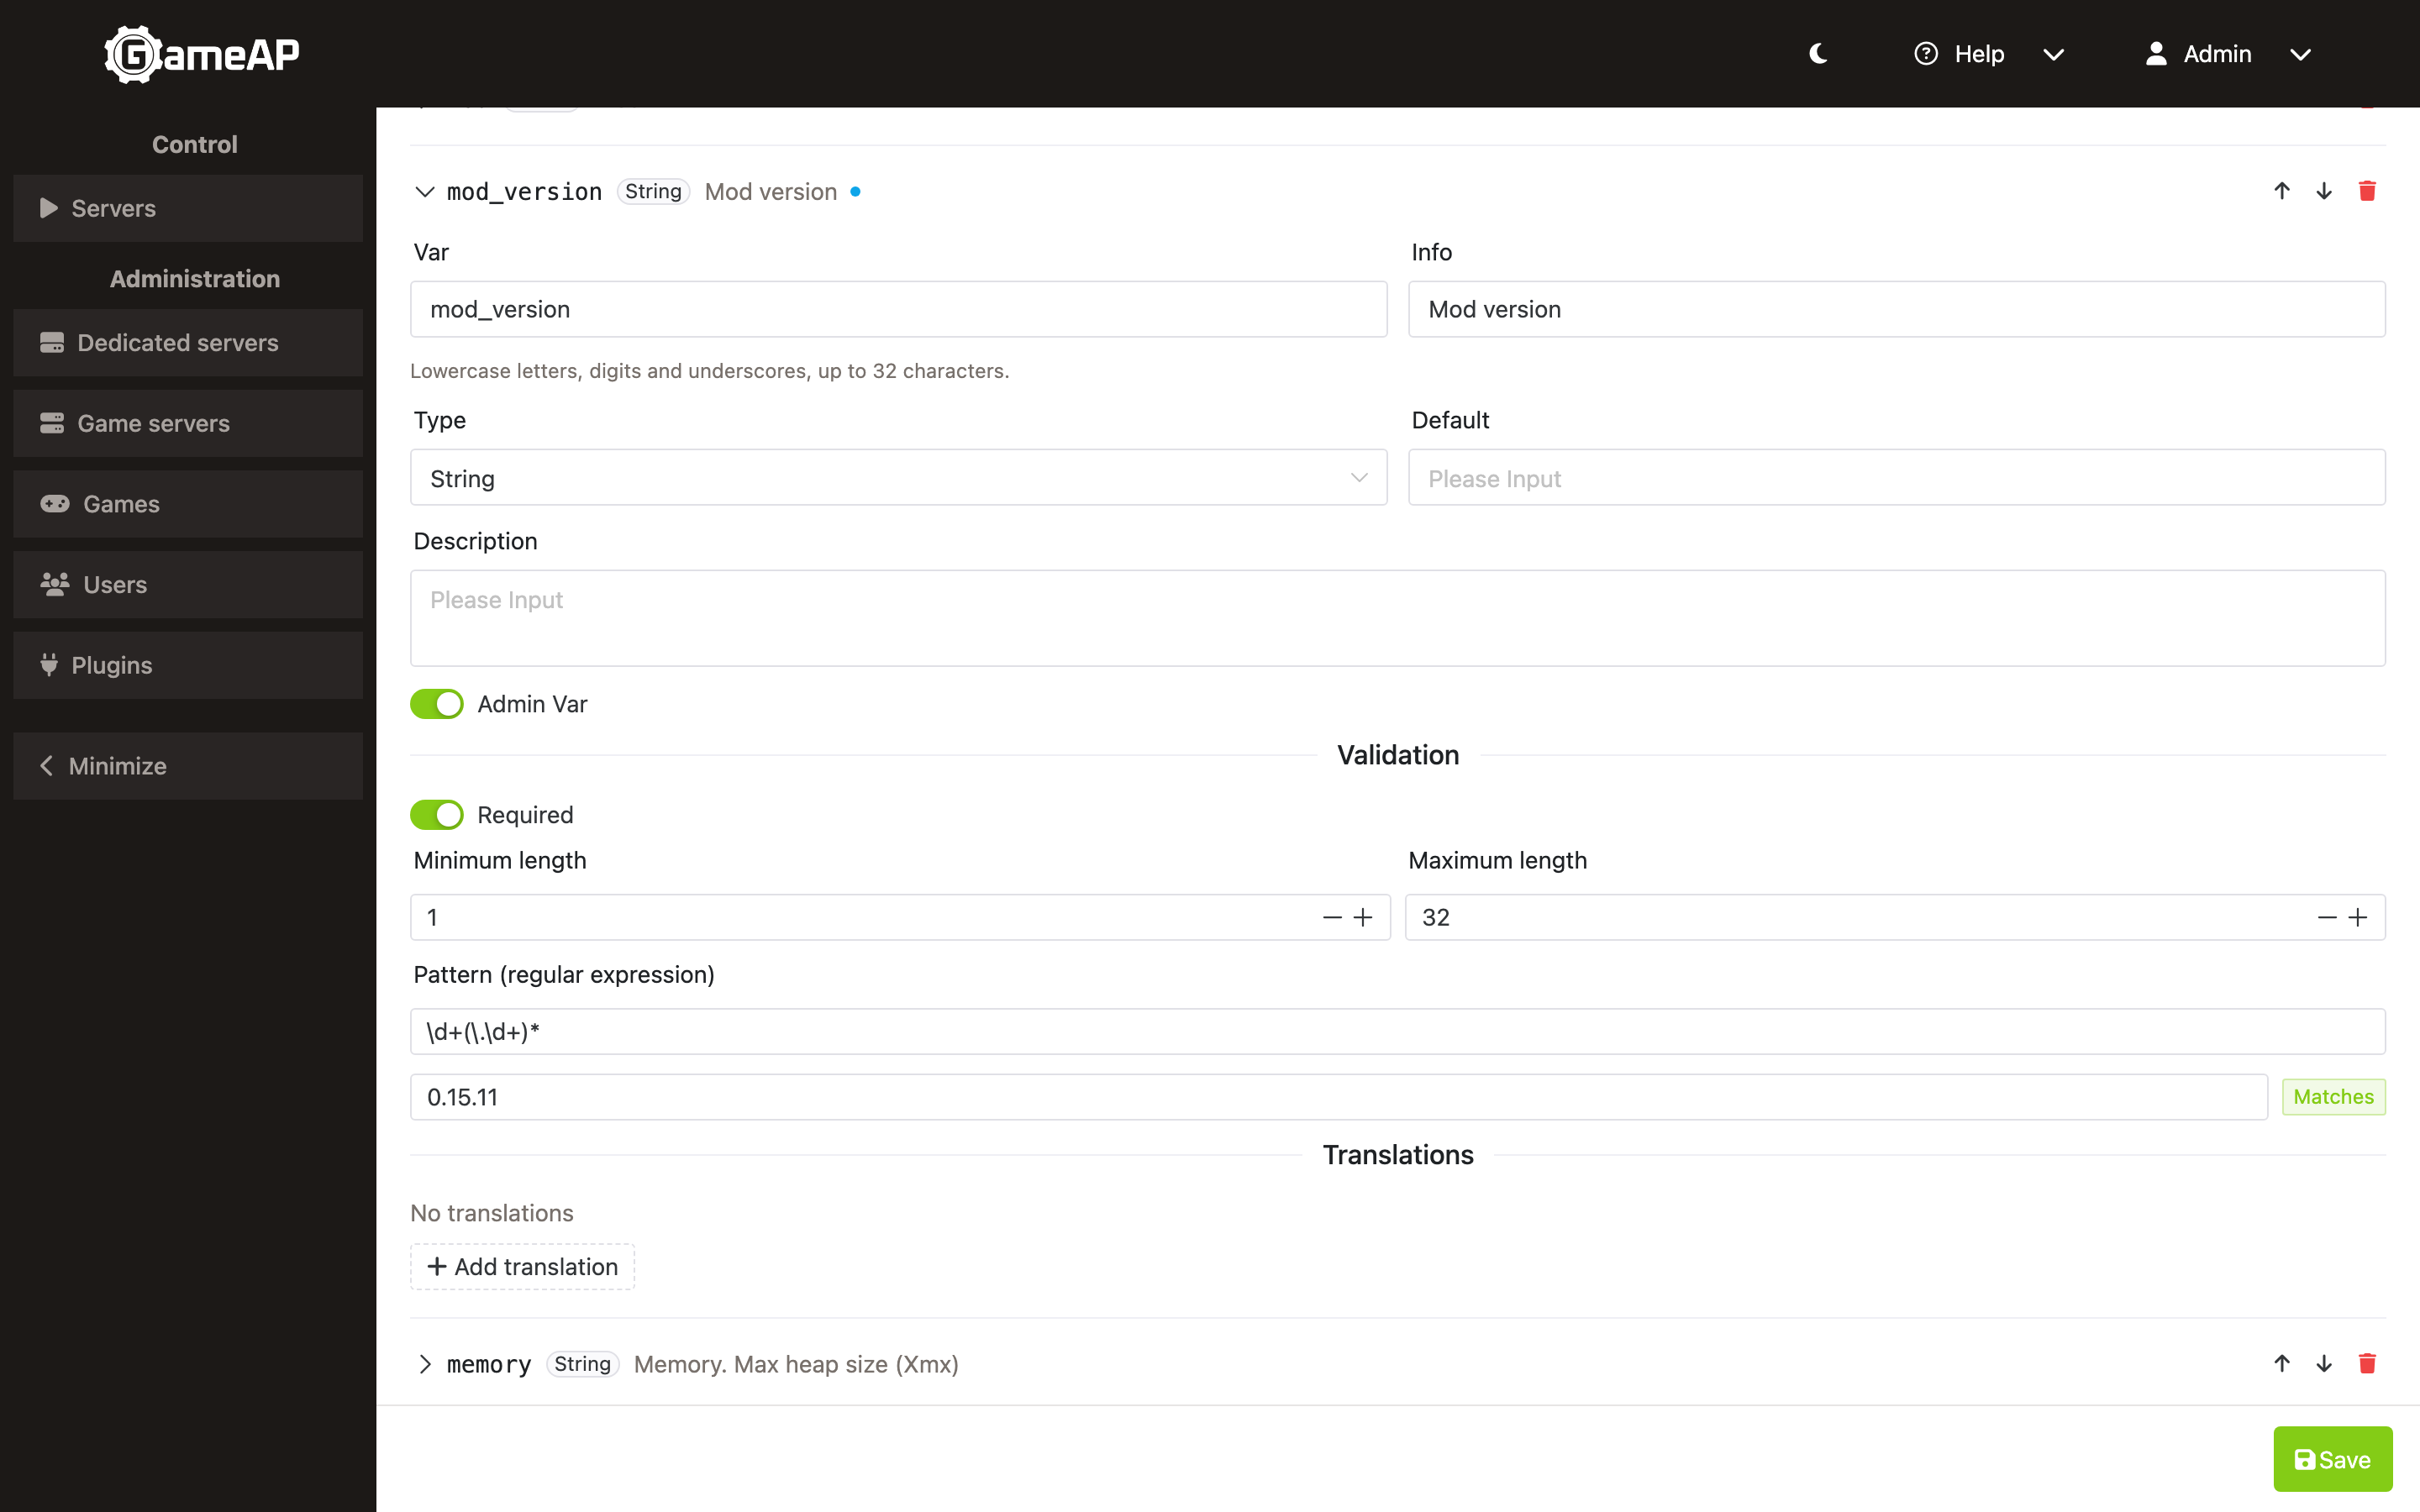
For a Select the option list is a rule in itself: a value outside the list is rejected unless custom values are allowed. A textual value without a Maximum length rule is still capped at 4096 characters.
Translations
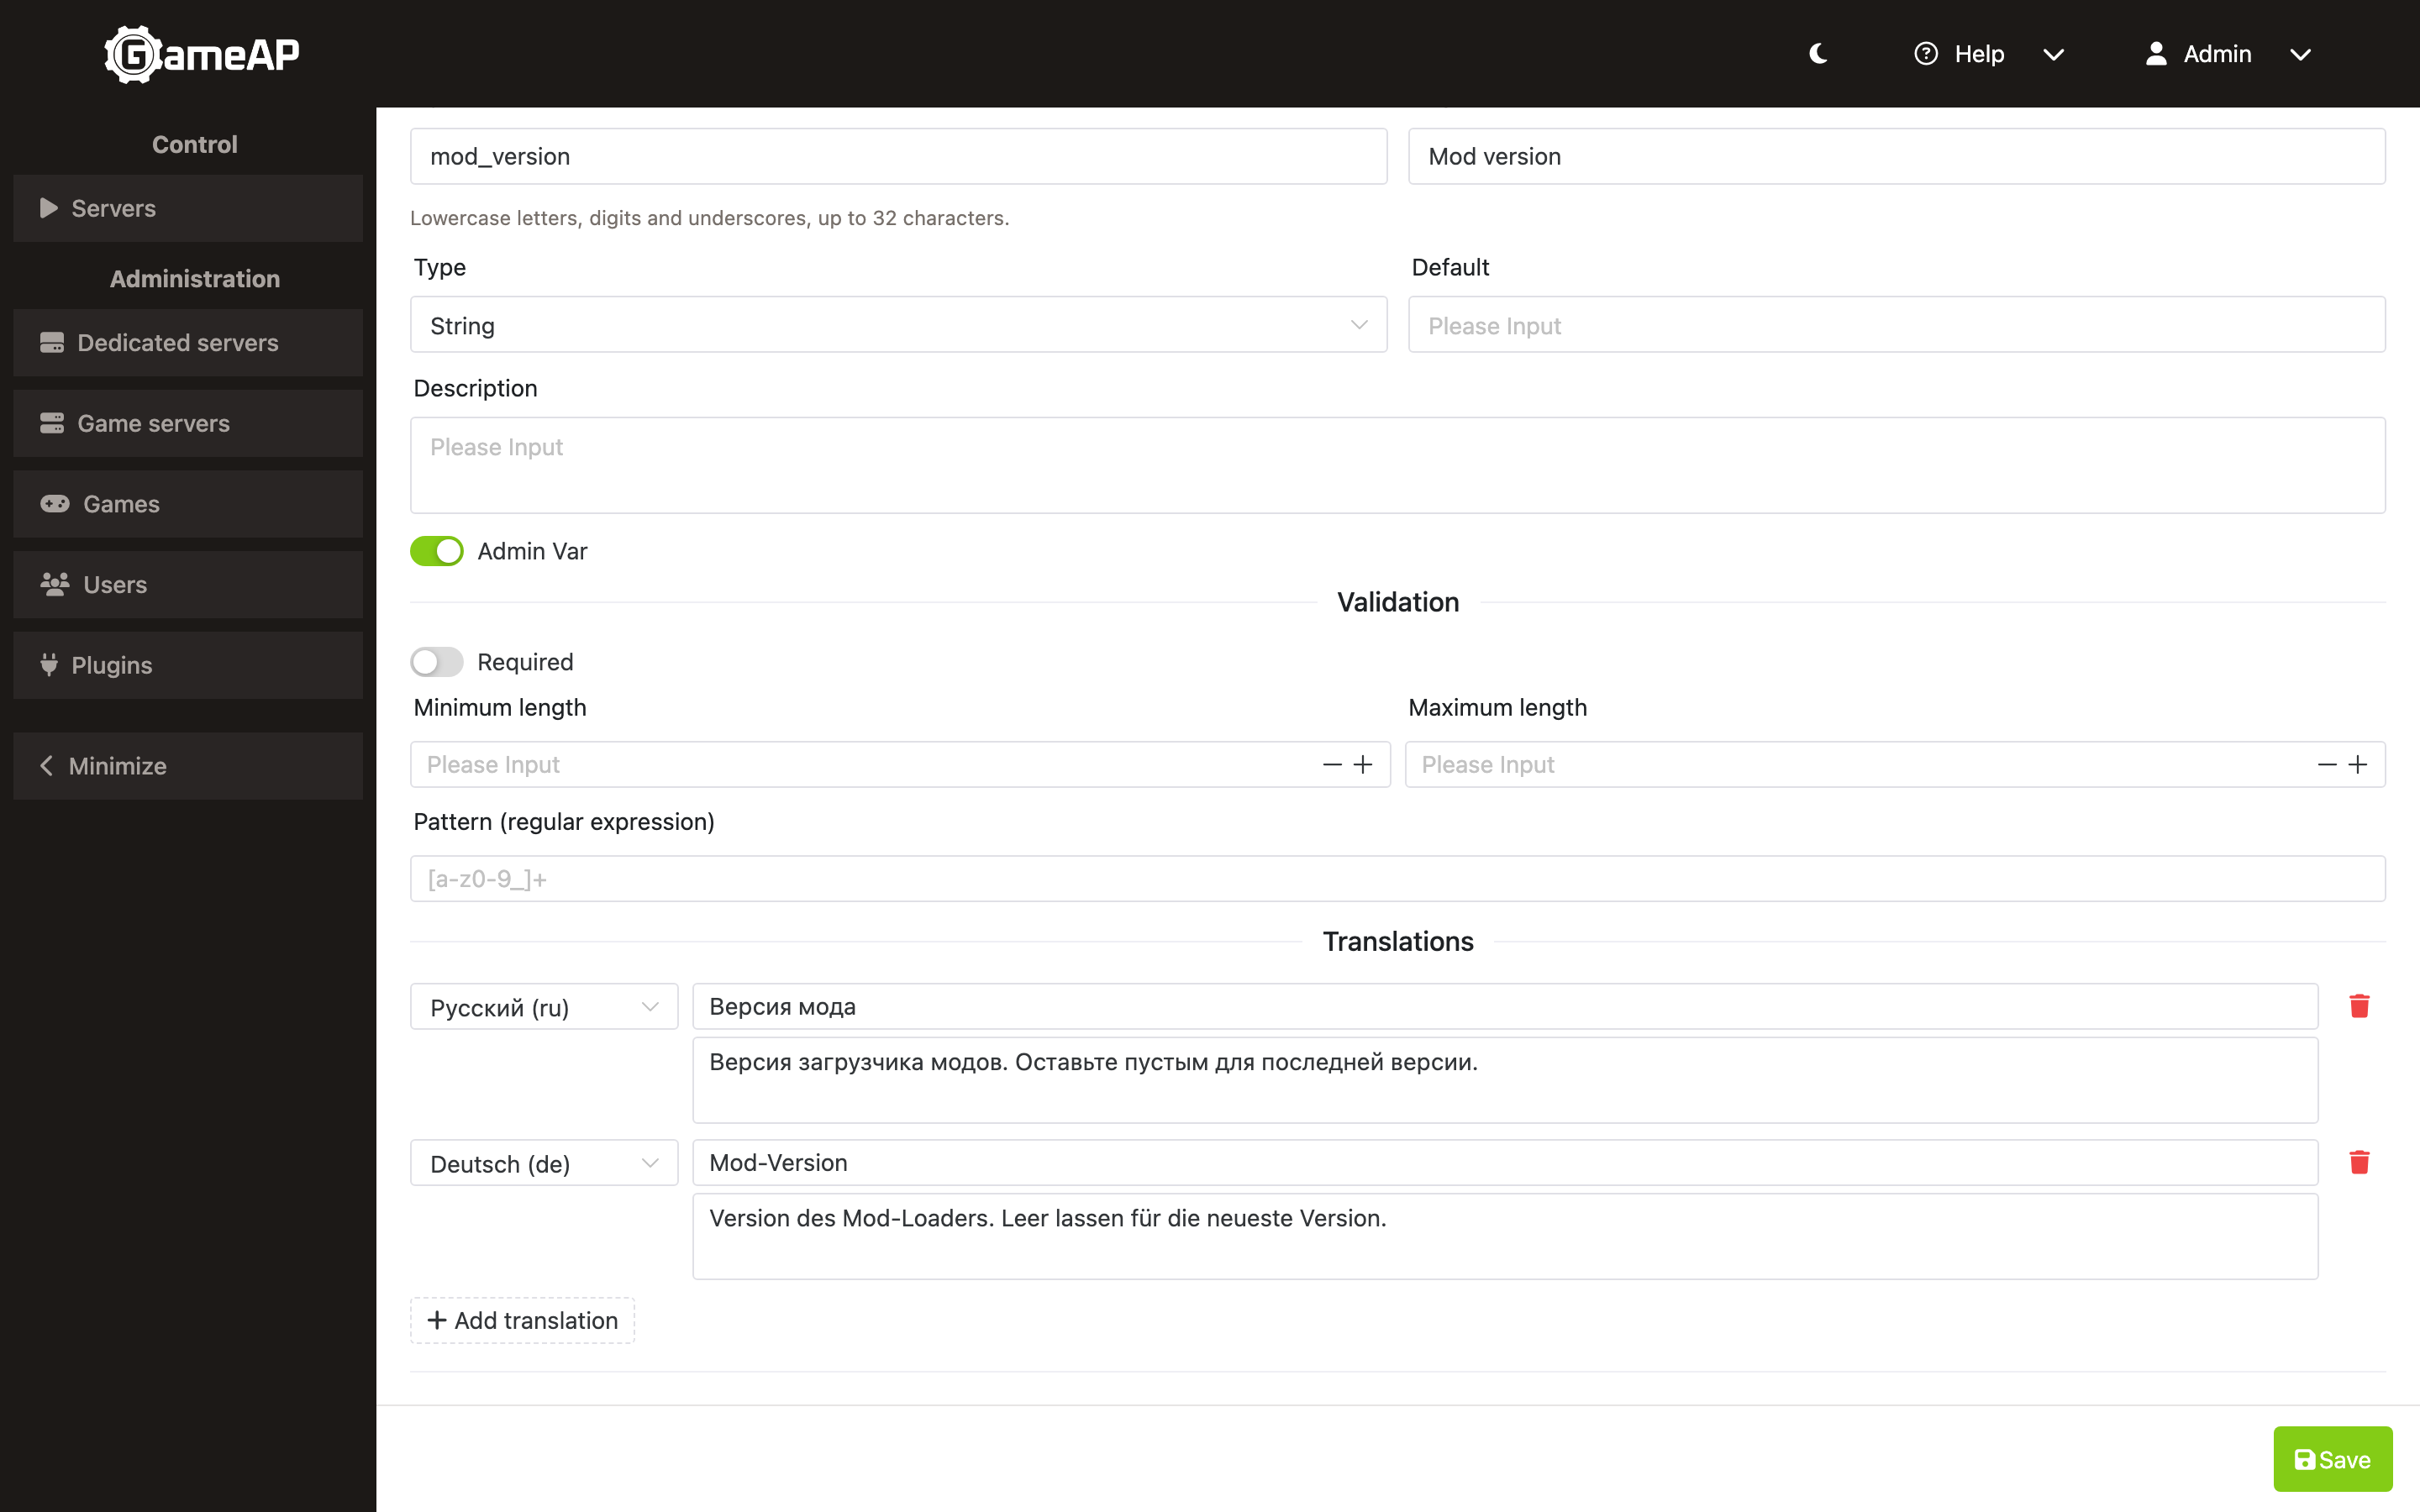
Info, Description and option labels are written in English. Translations for other panel
languages are added in the Translations block of the variable (Info and Description) and,
for a Select, by the languages button next to each option (its Label). Pick the
Language — a lowercase locale code such as ru, uk or pt-br — and enter the translated
text. en cannot be added: the English text is taken from the main fields. Each language may be
used once. The user sees the text in the panel’s current language; when there is no translation,
the English text is shown.
Examples
| Values | Result |
|---|---|
Var: default_map Info: Default map Type: Select Options: de_dust2, de_inferno, de_nuke Default: de_dust2 |
Every server of this mod gets the shortcode {default_map} and a Default map drop-down in its Settings, preset to de_dust2. Any other value is rejected |
Var: maxplayers Info: Maximum players Type: Integer Default: 16 Validation: Minimum 1, Maximum 64 |
A Maximum players number field; values outside 1–64 are not saved |
Var: server_token Info: Steam GSLT Type: Password Admin Var: on |
The token is hidden while typing and is visible and editable only to administrators |
Metadata
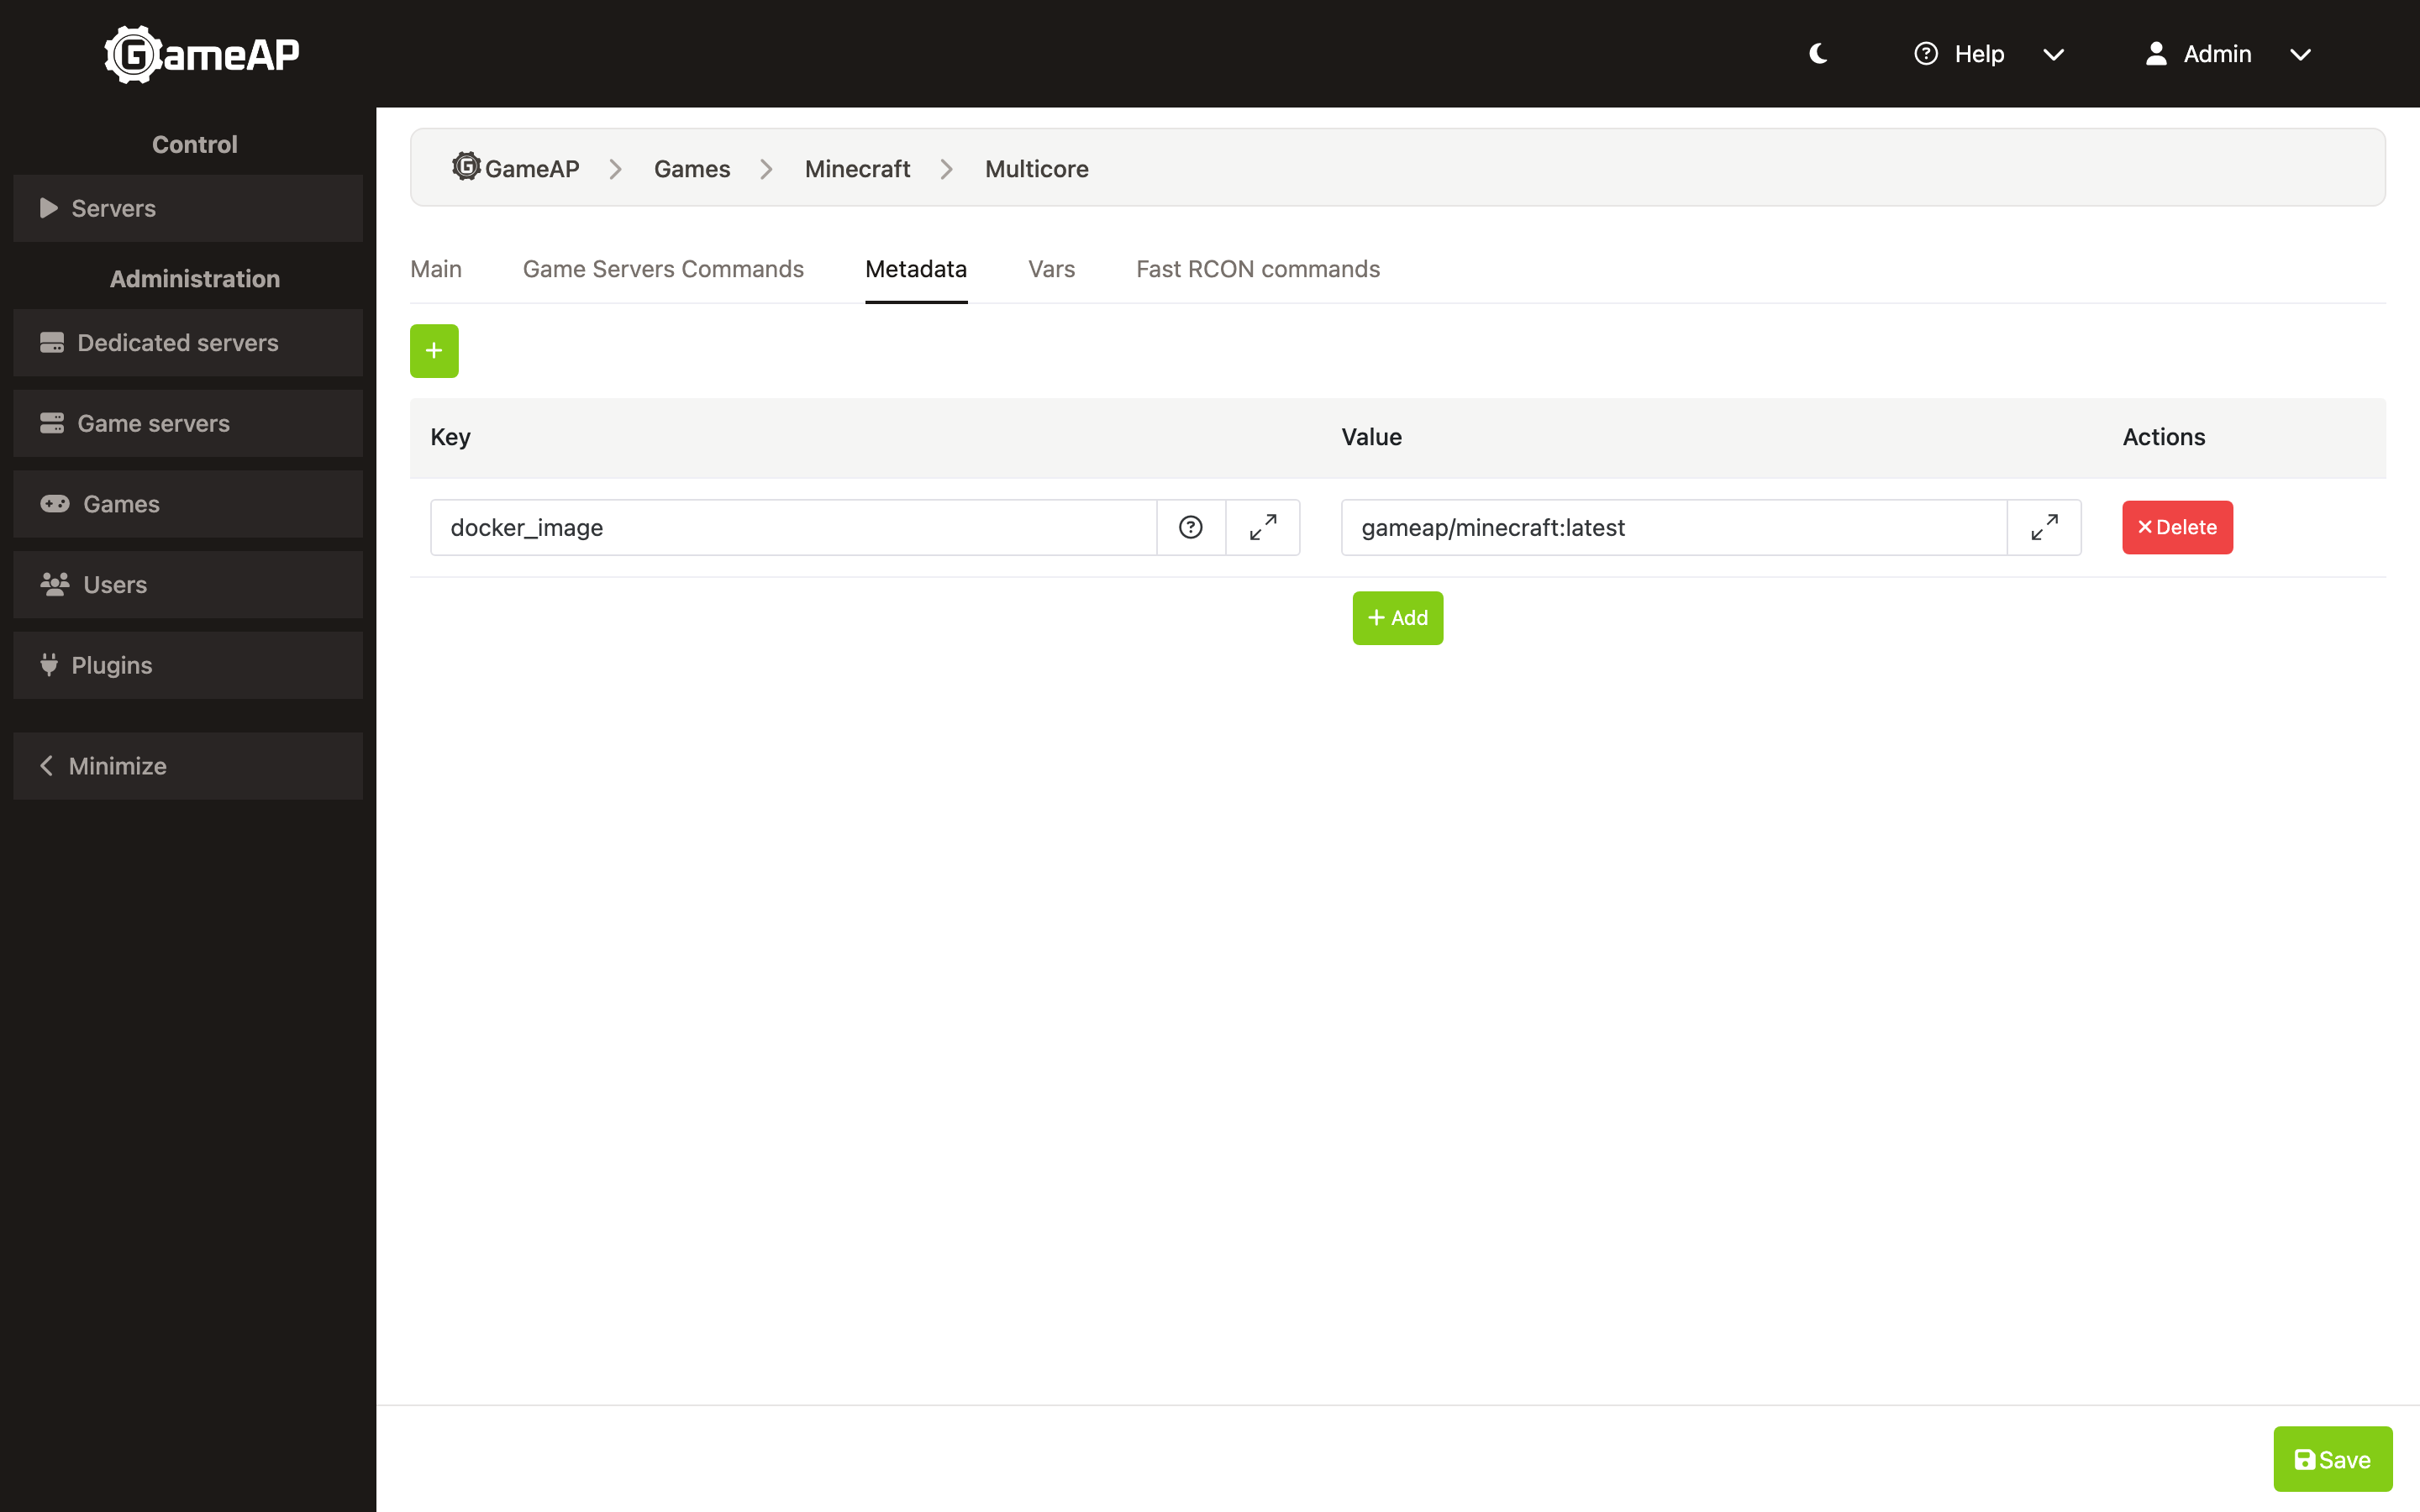
The Metadata tab holds arbitrary Key / Value pairs attached to the mod. The daemon reads
container settings from them when the node runs game servers in Docker or Podman: docker_image,
docker_workdir, docker_volumes, docker_installation_script and the other docker_* keys. A key
is looked up in order: server variables, then the mod’s metadata, then the game’s metadata; values
must be strings. The ? button next to the Key field opens the Metadata keys reference,
which lists the known keys with an example for each; they are described in
Process Managers.
RCON commands
These commands are set in the Game Servers Commands tab. They allow more advanced game server administration. If the game supports working with RCON or if the console is supported, you can do the following: kick players from the server, ban players, change the server map, send text messages to the common chat, set a password.
Some features may be limited by the game itself or by the mod. For example, not all game servers support server login with a password.
Kick command
You can set the RCON command to kick a player from the server.
You can set shortcodes for the command that will be replaced with the data of a certain player
| Shortcode | Description |
|---|---|
| {id} | Server player ID |
| {name} | Server player name |
For many GoldSource/Source games, this is the command:
kick #{id}
Ban command
You can set a command that will be used for a temporary or permanent ban of a player on the server.
You can set shortcodes for the command that will be replaced with the data of a certain player
| Shortcode | Description |
|---|---|
| {id} | Server player ID |
| {name} | Server player name |
| {time} | Ban time |
| {reason} | Ban reason |
For many GoldSource games (Half-Life, Counter-Strike 1.6, etc.) running AMX Mod X, this is the command:
amx_ban "{name}" {time} "{reason}"
Name (nickname) change command
With this command, you can change the selected player’s nickname.
You can set shortcodes for the command that will be replaced with the data of a certain player
| Shortcode | Description |
|---|---|
| {id} | Server player ID |
| {name} | Current server player name |
| {new_name} | New server player name |
| {reason} | Reason for change |
For many GoldSource games (Half-Life, Counter-Strike 1.6, etc.) running AMX Mod X, this is the command:
amx_nick #{id} {new_name}
Restart command
You can set the command to soft restart the server, without restarting the game server process. Usually, this command restarts the game map or round. Not supported by many games.
For many GoldSource/Source games, this is the command:
restart
Map change command
With this command, you can change the game server map.
| Shortcode | Description |
|---|---|
| {map} | Map name |
For many GoldSource/Source games, this is the command:
changelevel {map}
Send message command
With this command, you can send a text chat message to all players on the server.
| Shortcode | Description |
|---|---|
| {msg} | Message to be sent to the server |
For many GoldSource games (Half-Life, Counter-Strike 1.6, etc.) running AMX Mod X, this is the command:
amx_say "{msg}"
Set/change password command
You can set a password for the game server, so only players who know this password, can log in.
| Shortcode | Description |
|---|---|
| {password} | Server password |
For many GoldSource/Source games, this is the command:
password {password}
Fast RCON commands
In the Fast RCON commands tab you can add your own RCON commands — for example a server status command, statistics or a list of recently disconnected players. They appear as buttons in the server’s RCON console; a click sends the command.
| Field | Description |
|---|---|
| Info | Button label shown in the panel, up to 128 characters |
| RCON Command | Console command sent to the game server |
The label can be translated: the languages button next to the entry opens the same
Translations block as for variables — en is not allowed, the English text is taken from
Info.